When Adduction Meets Rotation (and Why Your Hip Is Negotiating with Itself)
This is Ashtanga Tech Support — long-form, mechanism-first conditioning pieces for the joint actions the practice quietly demands and rarely trains directly.
The question that prompts this
Some version of: “My knee hurts in lotus.” (We covered the knee. Today’s answer: it’s not the knee.) “I can’t bind in Marichyasana D.” “Eagle pose feels impossible.” “Why does my hip pinch in the front when I do figure-4?” “Why can’t my top knee come down in seated cross-legged?”
These questions are all asking the same anatomical question, and the answer is a 2×2 matrix.
The hip can adduct (bring the leg toward midline). The hip can internally rotate or externally rotate. The combinations of these two actions describe almost every position the practice puts your hip in that isn’t a forward fold or a backbend. And most practitioners have one combination they live in, one they tolerate, and two they have never trained.
Let’s lay out the matrix and condition all four corners.
Anatomy in one paragraph
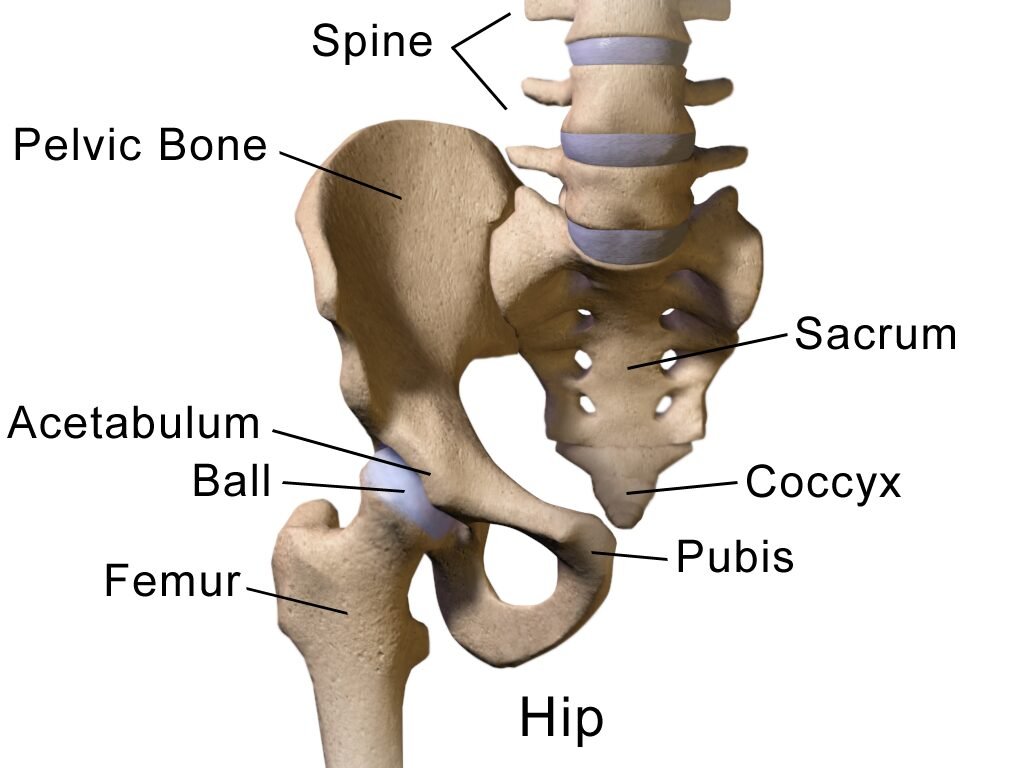
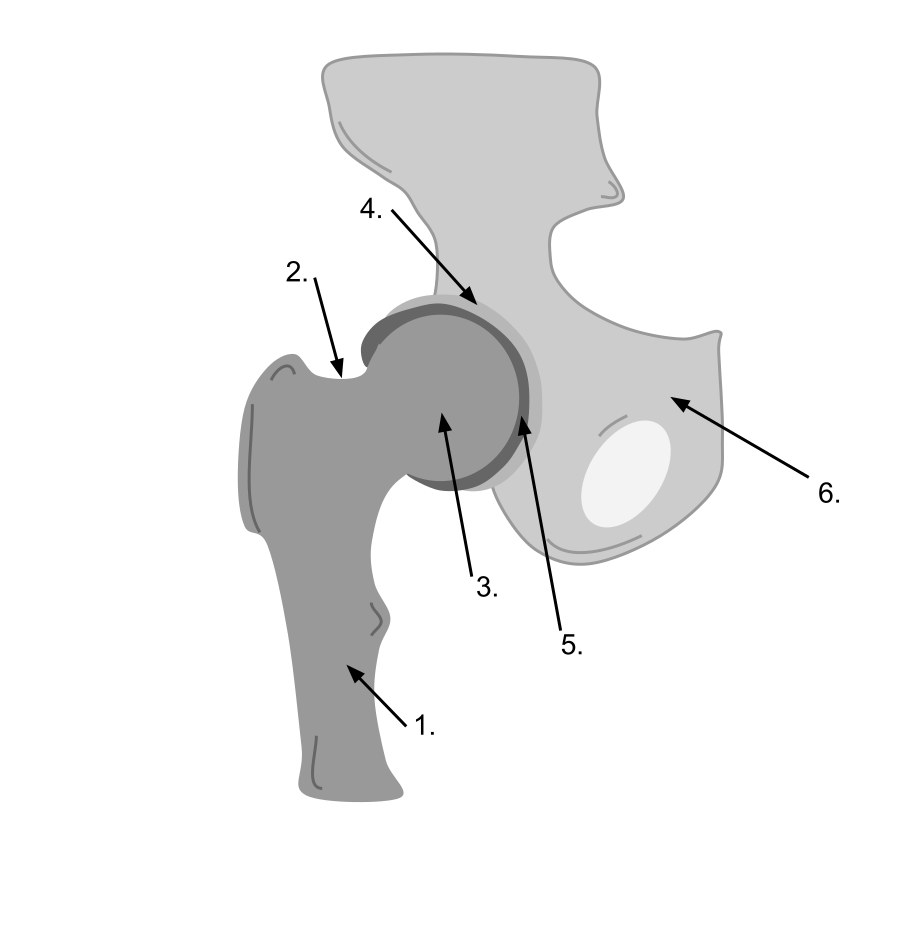
The hip is a synovial ball-and-socket joint where the head of the femur articulates with the acetabulum of the pelvis. The femoral neck angles forward from the shaft (anteversion, normally ~15°), which means rotation at the hip is not a clean spin — it’s a coupled motion where the femoral head explores different parts of the acetabular surface. Adduction brings the femur toward midline; the limit is bony when the leg crosses far enough (the femoral neck eventually hits the acetabular rim) and tissue-mediated otherwise (the gluteus medius/minimus and the iliotibial band tension up). Combined with rotation, adduction loads different sectors of the labrum: adduction + IR drives the femoral head into the anterior labrum (this is the FADIR position — the standard clinical test for anterior femoroacetabular impingement). Adduction + ER loads the posterior-inferior capsule and stretches the deep external rotators. Different demands, different tissues, different training implications.
The 2×2 matrix
| External Rotation | Internal Rotation | |
|---|---|---|
| Adduction (leg toward midline) | The lotus quadrant. Femoral head loads posterior. Padmasana, half-lotus, figure-4. Most commonly trained in Ashtanga but rarely isolated. | The eagle quadrant. Femoral head loads anterior. Garudasana wrap, Gomukhasana legs, cross-body knee hug. The under-trained corner. |
| Abduction (leg away from midline) | The wide-second quadrant. Trikonasana, Parsvakonasana, Konasana family. | The Warrior-A back leg quadrant. Subtle but real. |
Today’s focus: the top row. Both adduction quadrants. Both rotational pairings. Trained on each leg.
The reason the matrix matters: practitioners who can do Padmasana but cannot wrap an Eagle leg are not “less flexible” — they have trained one corner of the hip and not the other. Practitioners who can wrap an Eagle but cannot bind Marichyasana D have trained the IR corner and not the ER corner. And bilaterally, most students have a dominant side — the hip that finds Padmasana easily on one side is almost always the same hip that struggles with the IR work on the same side, while the contralateral hip shows the opposite pattern. The body is asymmetric. Pretending otherwise costs you intermediate series.
Where each combination lives in the practice
Adduction + External Rotation (the lotus quadrant)
- Padmasana / full lotus — bilateral demand: both hips in deep flexion + ER + adduction
- Ardha Baddha Padmottanasana — unilateral, lifted leg
- Ardha Baddha Padma Paschimottanasana — unilateral, folded leg under load
- Marichyasana B & D — half-lotus combined with twist
- Vatayanasana — half-lotus standing; loaded
- Garbha Pindasana, Pindasana, Urdhva Padmasana, Yoga Mudra, Matsyasana, Kukkutasana — sustained padmasana
- Bharadvajasana — virasana side has IR, half-lotus side has ER + adduction
- Eka Pada Sirsasana, Dwi Pada Sirsasana, Yoginidrasana — extreme ER + adduction at end-range flexion
- Supta Padangusthasana (the cross-body variant) — adduction + ER under hip flexion
- Pasasana — squat with feet together drives subtle adduction with variable rotation
Adduction + Internal Rotation (the eagle quadrant)
- Gomukhasana legs — bilateral adduction + IR; one of the few Ashtanga poses that explicitly trains this
- Garudasana legs — not in primary/intermediate but worth conditioning; the wrap demands adduction + IR on the wrapped leg AND on the standing leg
- Janu Sirsasana C (folded leg) — flexion + IR with adduction-leaning foot position
- Some setups for Marichyasana D — if the bind is being forced, the bound leg can drift into IR + adduction (this is wrong; train the proper combo instead)
- The standing-leg side of single-leg balance work — subtle but real
The asymmetry between these two lists is exactly the asymmetry in most students’ hips. Ashtanga’s primary and intermediate series load the ER + adduction corner heavily (Padmasana shows up everywhere from primary to advanced). The IR + adduction corner shows up in Gomukhasana and a few setups. The result: an Ashtanga practitioner of ten years often has the ER side dialed in and the IR side completely undertrained.
Assessment: the four-corner test
Sit on the floor. Each side independently. Hands off — purely active.
Test 1: Adduction + ER (the figure-4 / lotus probe)
Lying supine. Right ankle crossed over left thigh, just above the knee. Now actively pull the right knee toward the left shoulder without using the hands. The right hip is doing flexion + ER + adduction simultaneously. Most practitioners can find ~30°. Lotus-prep target: closer to 60°.
Test 2: Adduction + IR (the eagle probe)
Lying supine. Right knee bent, foot flat. Now actively let the right knee fall across the body toward the left, without rolling the pelvis. The right hip is doing flexion + IR + adduction. Most practitioners can find ~10–15°. Eagle-prep target: 30°+.
Test 3: Standing-leg adduction with rotation (the single-leg balance probe)
Stand on the right leg. Lift the left foot. Now actively press the right inner thigh toward the left while maintaining a level pelvis. This is the supporting-leg adduction demand that lives quietly in every standing pose. Most students don’t know they have access to this until they try.
Test 4: Bilateral adduction with crossed rotation (the 90-90 probe)
Sit. Right leg bent in front of you with the outside of the leg on the floor (right hip in flexion + ER + adduction). Left leg bent behind you with the inside of the leg on the floor (left hip in flexion + IR + abduction). This is the FRC 90-90 position. Now sit upright without hands. The two hips are doing opposite work simultaneously. The one that fails is your training priority.
Protocol 1: Hip CARs (the four-corner sweep)
The morning baseline. Three minutes per side. Both directions.
How:
- Standing, holding a wall or chair for stability. Knee tracking in front of you, lifted to ~90° flexion to start.
- Trace the largest possible circle with the knee while keeping the pelvis still. Flexion → abduction → external rotation → extension → internal rotation → adduction → return.
- 5 reps each direction.
- Watch for pelvic cheating. If the pelvis tilts to “give” the hip more room, you’ve left the CAR. Pin the pelvis. Try again.
The diagnostic inside the diagnostic: the slow spot in your circle is the corner you haven’t trained. For most students, it’s somewhere between adduction and IR — the eagle quadrant.
Reference video — Functional Range Conditioning Hip CARs (official):
Watch:
Protocol 2: Adduction + External Rotation PAILs/RAILs
The lotus-prep protocol. For Padmasana, half-lotus variants, figure-4 deep work. For the hip to own the position rather than passively flopping into it.
Setup: Supine figure-4. Right ankle crossed above left knee. Reach the hands behind the left thigh and pull both legs toward the chest until the right hip finds end-range adduction + ER. Find the first end-range, not the last.
The sequence:
- Passive position — 2 minutes. Let the tissue lengthen.
- PAILs — 10 seconds. Press the right knee out and away (toward abduction + IR) into the resistance of your hands at 100% effort. Ramp slowly.
- RAILs — 10 seconds. Now actively pull the right knee deeper into adduction + ER, fighting against the limit. 100% effort.
- Passive return — 60 seconds.
- Repeat 2–3 rounds per side.
Reference video — 90/90 Internal & External Hip Mobility PAILs/RAILs:
Watch:
Loaded variation — Active Pigeon Stretch:
Watch:
The active pigeon is the same matrix corner under different geometry — kneeling instead of supine. Useful when the supine figure-4 has plateaued and you want gravity loading the joint differently.
The key teaching: this is the “hip opener” everyone has heard of, but most students do it as passive stretching. The PAILs/RAILs version is what turns passive range into actively owned range. The difference is the difference between needing your hand to set up half-lotus and being able to lift your foot into half-lotus from tabletop.
Protocol 3: Adduction + Internal Rotation PAILs/RAILs
The under-trained quadrant. The eagle-prep protocol. For the hip to find anterior range without impinging.
Setup: Supine. Right knee bent to 90°, foot flat on the floor. Slowly let the right knee fall to the left across the midline — do not let the pelvis follow. Use the left hand on the right knee for assistance to find end-range. The right hip is now in flexion + adduction + IR.
The sequence:
- Passive position — 90 seconds. If you feel pinching in the front of the hip, back off 15°. Anterior pinching here is the FAI signal — the position is too aggressive for your current capacity.
- PAILs — 10 seconds. Press the knee back up and away (toward abduction + ER) into the resistance of your hand, 100%.
- RAILs — 10 seconds. Pull the knee deeper into adduction + IR, 100%.
- Passive return — 60 seconds.
- Repeat 2–3 rounds per side.
Reference video — Hip Internal Rotation FRC PAILs/RAILs:
Watch:
Active progression — 90/90 Internal Rotation Lift Off:
Watch:
The lift off is the same matrix corner trained as active range. Once the PAILs/RAILs have generated capacity, the lift-off proves you own it — back-leg knee comes off the floor under pure muscular control.
This protocol is the one most Ashtanga practitioners have skipped for ten years. It is also the one most likely to reveal anterior hip impingement, hip-flexor tightness masquerading as glute weakness, and pelvic asymmetry. Six weeks of consistent dosing changes the hip in measurable ways.
Protocol 4: 90-90 Integration (both hips simultaneously)
The FRC canonical. The combined demand. This is where the matrix gets trained as a unit instead of as four separate corners.
Setup: Sit on the floor. Right leg bent in front, ~90° flexion, outside of leg on the floor (right hip = flexion + ER + adduction). Left leg bent behind, ~90° flexion, inside of leg on the floor (left hip = flexion + IR + abduction). Sit upright. Both hips are working simultaneously, in opposite rotational states.
The sequence:
- Passive position — 2 minutes. Sit upright. Hands by hips for support if needed.
- PAILs (front leg, ER side) — 10 seconds. Press the front-leg knee and ankle into the floor at 100% effort.
- RAILs (front leg, ER side) — 10 seconds. Lift the front knee actively, fighting the floor while keeping the position.
- Brief rest.
- PAILs (back leg, IR side) — 10 seconds. Press the back-leg knee and ankle into the floor at 100%.
- RAILs (back leg, IR side) — 10 seconds. Lift the back knee actively.
- Switch sides — same sequence with legs reversed. The previously-back leg becomes the front leg.
Reference video — 90/90 Hover (front leg lift, ER focus):
Watch:
Knee Hinge Hovers (rotation-specific drill):
Watch:
This is the integration test. If you can sit upright in a clean 90-90 on both sides for 2 minutes without props, your hip matrix is conditioned. If you cannot, the asymmetric corner is your homework.
End-Range Work
Once Protocols 1–4 are tolerable, integration begins. These are the dose-response drills — what you do once the matrix has been opened by the PAILs/RAILs work.
End-Range Drill 1: 90-90 Lift-Offs
Sit in 90-90. Without using the hands, actively lift the front shin off the floor. Hold for 5 seconds. Lower. 5 reps. Then lift the back shin off the floor (this is harder). Hold 5 seconds. 5 reps. Switch sides. This is the active-range translation of the position — what you can do without props, gravity, or assistance.
Watch: 90/90 Hip Lift Exercise (active 90-90 lift-offs)
End-Range Drill 2: Active Half-Lotus from Tabletop
On hands and knees. Lift the right shin and externally rotate the hip to bring the foot toward the left hip crease. Hold the position with the muscles only — no hands, no floor support. 30 seconds → 90 seconds. This is half-lotus prep without the seated cheat of letting gravity do the work.
Watch: Lift the foot into half-lotus from tabletop — hip ER, no arms
End-Range Drill 3: Eagle Wrap from Standing
Standing on the right leg. Lift the left leg and wrap it across the right thigh (the Eagle-leg position). Hold without the wrapped foot hooking — pure adductor + IR strength. 30 seconds → 60 seconds. Switch sides. The asymmetry is informative.
Watch: Garudasana / Eagle Pose tutorial (Dylan Werner)
End-Range Drill 4: Loaded Cross-Body Hip Flexion
Supine. Pull the right knee across the body toward the left shoulder. Hold actively for 60 seconds, breathing into any anterior pinching (which should resolve as the hip relaxes). This is FADIR-position load training — done correctly, it is the antidote to the impingement, not the cause.
Watch: Supine Figure-4 / cross-body hip stretch (FADIR-adjacent)
End-Range Drill 5: Shin Box Get-Up
From the 90-90 seated position, use the front-leg foot and back-leg knee to press up into a tall-kneeling position without using the hands. Lower back down with control. This is the locomotor expression of the matrix — the hips translating between ground and standing, asymmetric work, end-range under load.
Reference video — Shin Box Get Up:
Watch:
End-Range Drill 6: Cossack Squat
Wide stance. Sink into one bent leg with the other extended, foot pointing up. The bent-leg hip is in deep flexion + ER + adduction. The extended-leg hip is loaded into adduction + IR through the hamstring/groin chain. Move side to side under control. This is the standing version of the matrix — frontal-plane work that loads both adduction quadrants in alternation.
Reference video — Cossack Squat (adductor focus):
Watch:
The principle is the same as the other tech support pieces: don’t stretch into end range, own end range.
Drill Library: Quick-Reference Variations
A cookbook of FRC and FRC-adjacent drills covering this matrix. Pick what fits the day. None of these replace Protocols 1–4 — they’re variations and progressions for when the basics are stale or when you want a different geometry loading the same corner.
| Drill | Primary Matrix Corner | Application |
|---|---|---|
| Hip CARs (official FRC) | All four corners (sweep) | Daily baseline |
| Butterfly PAILs/RAILs | Adduction range (bilateral, ER-leaning) | Bilateral hip opener; Baddha Konasana prep |
| Hip IR/ER Masterclass (90-90) | All four corners | Comprehensive 90-90 drill set |
| Hip Internal Rotation PAILs/RAILs (FRC) | ADD + IR | Eagle-prep / FADIR conditioning |
| 90/90 Internal & External Mobility Drills | Bilateral integration | Both hips, both rotations, sequenced |
| 90/90 IR Lift Off | ADD + IR (back leg, active range) | Back-leg knee hovers off the floor |
| 90/90 Hover (ER) | ADD + ER (front leg, active range) | Front-leg lift; Padmasana-prep active strength |
| Knee Hinge Hovers | Rotation under flexion | Rotational range training in 90-90 |
| Active Pigeon Stretch | ADD + ER (kneeling, gravity-loaded) | Loaded ER conditioning; alternative to supine figure-4 |
| Shin Box Get-Up | Bilateral integration + locomotion | Translating matrix to vertical movement |
| Cossack Squat (adductor focus) | Both adduction corners (alternating) | Standing frontal-plane loading; squat-pattern integration |
Where this shows up in the practice
| Pose | Working Hip(s) | Combination |
|---|---|---|
| Padmasana | bilateral | flexion + ER + adduction (both hips, full demand) |
| Ardha Baddha Padmottanasana | lifted leg | flexion + ER + adduction; standing leg has subtle IR + adduction |
| Ardha Baddha Padma Paschimottanasana | folded leg | flexion + ER + adduction under spinal flexion load |
| Marichyasana B | half-lotus leg | deep flexion + ER + adduction; opposite leg deep flexion + neutral rotation |
| Marichyasana D | half-lotus leg + twist | flexion + ER + adduction + spinal rotation; opposite leg deep flexion + IR |
| Vatayanasana | half-lotus leg | flexion + ER + adduction; standing leg in adduction + IR (rare combo on weight-bearing leg) |
| Garbha Pindasana, Pindasana, Urdhva Padmasana, Yoga Mudra | bilateral | sustained ER + adduction under varying loads |
| Bharadvajasana | bilateral asymmetric | one side ER + adduction (half-lotus), other side IR + adduction (virasana variant) |
| Eka Pada Sirsasana | working leg | extreme flexion + ER + adduction at end-range; opposite leg supports |
| Yoginidrasana, Dwi Pada Sirsasana | bilateral | end-range demand on both hips simultaneously |
| Janu Sirsasana C | folded leg | flexion + IR with adduction-leaning foot position |
| Gomukhasana | bilateral | the only Ashtanga pose that explicitly trains adduction + IR on both hips |
| Garudasana legs (when added) | wrapping leg | adduction + IR; standing leg subtle adduction + IR |
| Supta Padangusthasana C (cross-body) | working leg | adduction + ER + flexion; opposite leg neutral |
| Pasasana | bilateral | bilateral adduction with variable rotation; squat with feet together |
Programming
Beginner / pre-protocol student:
- Hip CARs daily, 3 minutes per side
- 4–6 weeks before adding PAILs/RAILs
- Test 1 and Test 2 weekly to track active range gains
- Skip forced lotus during this period — use sukhasana or virasana with prop support
Established practitioner:
- Hip CARs daily before practice
- Adduction + ER PAILs/RAILs, 3x/week
- Adduction + IR PAILs/RAILs, 3x/week (yes, the same frequency — this is the under-trained side and needs catching up)
- 90-90 integration daily, 2 minutes per side
- One end-range drill from the library, 2x/week (rotate variations)
Advanced / teaching: All of the above, plus:
- Pre-screen students’ Test 1, Test 2, and 90-90 before assigning Padmasana, Marichyasana D, or any half-lotus variant.
- Pay attention to bilateral asymmetry — most students have a “good” Padmasana side and a “bad” side. The bad side is rarely a knee problem; it is almost always the same-side hip not reaching its rotation range.
- Use the Cossack Squat and Shin Box Get-Up as integration tests — if a student can do these cleanly, the matrix is owned. If not, the failing corner is programming priority.
- The student who cannot find 30°+ of adduction + IR on one side is the student whose intermediate series will eventually produce contralateral SI complaints. The matrix protects the back.
A note on impingement, labrums, and the FAI question
FADIR position (Flexion + ADduction + Internal Rotation) is the standard clinical test for anterior femoroacetabular impingement. It is also Protocol 3. The relevant teaching:
- If Protocol 3 produces a sharp, pinching sensation in the front of the hip (not a stretch in the glute, not a deep pull in the back of the hip) — back off the depth and consult a sports-medicine physician. You may have cam-type or pincer-type FAI that benefits from imaging and assessment.
- If Protocol 3 produces a deep stretching sensation in the back of the hip — that is normal end-range tissue load, and the protocol is doing its job.
- Having mild FAI does not mean Protocol 3 is contraindicated forever. It means the depth of the position needs to be modulated until capsular ROM and rotational control catch up. CARs and shallow PAILs/RAILs remain valuable.
FABER position (Flexion + ABduction + External Rotation) — the figure-4 — is the position from Protocol 2 and Test 1. Sharp pain here is a different signal: posterior labral irritation, SI joint involvement, or deep external rotator dysfunction. Same advice: modify depth, get cleared, return to protocol.
The principle is the same as the other tech support pieces: the hip is honest at end range. It tells you which corner of the matrix it owns, which corner it tolerates, and which corner is currently a problem. Train all four corners. Trust the asymmetry to inform programming. Don’t let the practice ratchet one corner harder while three others atrophy.
Padmasana is a privilege of the bilateral matrix. So is Eagle. So is Gomukhasana. The matrix is the practice.
Further Reference
Each video below opens inline — click to expand. The full FRC playlist link is at the bottom.
Watch: Hip CARs (official, Functional Anatomy Seminars)
Watch: Hip Mobility Masterclass — IR & ER PAILs/RAILs
Watch: Hip Internal Rotation PAILs/RAILs (FRC)
Watch: Butterfly PAILs/RAILs (hip adduction range)
Watch: 90/90 Internal & External Mobility Drills
Watch: 90/90 IR Lift Off
Watch: 90/90 Hover (ER focus)
Watch: Knee Hinge Hovers (rotation drill)
Watch: Active Pigeon Stretch (loaded ER)
Watch: Shin Box Get-Up
Watch: Cossack Squat (adductor focus)
Watch: Functional Anatomy Seminars FRC playlist
Functional Range Conditioning® and FRC® are registered trademarks of Functional Anatomy Seminars. Linked videos are referenced for educational purposes; the protocols described here are derived from FRC principles taught through formal certification.
Companion Tech Support: the Lower Limb series
This piece is one of four. The lower limb is a chain — the ankle’s four corners feed the knee’s rotation window, which feeds the hip’s 2×2 matrix, which the hallux finally has to push off from. Train one in isolation and the next one up the chain will quietly compensate. Train the chain.
Watch: 90/90 Hip Lift Exercise (active 90-90 lift-offs)
Watch: Lift the foot into half-lotus from tabletop — hip ER, no arms
Watch: Garudasana / Eagle Pose tutorial (Dylan Werner)
Watch: Supine Figure-4 / cross-body hip stretch (FADIR-adjacent)
- The Ankle: Four Corners — The four-corner ankle complex and the FRC protocols the practice quietly demands.
- Hallux Conditioning — The big toe is a joint. Train it, or the chaturanga pivot will collect rent.
- Knee Rotation — Why the knee only rotates when bent, and how the screw-home mechanism protects the rest of the time.
Not sure where to start?
Chat with the intake assistant — tell it about your practice and it’ll point you to what fits.
Talk to the Intake Bot →
Discussion
or explore Student Union