Core Strengthening Practices
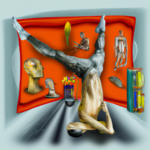 Yoga Techniques and Fitness
Overview
In this lesson, we explore a comprehensive collection of core strengthening practices, from pelvic tilts and leg lifts to planks, standing poses, and arm balances that target abdominal strength and spinal stability.
Objective
Become familiar with a wide range of exercises, poses, and techniques for cultivating core strength, organized by type and intensity, so you can choose and teach practices appropriate for various needs and levels.
What You'll Get
You'll walk away with a toolkit of core-focused practices that go beyond basic sit-ups, understanding how twists, inversions, balancing poses, and even pranayama engage your abdominals. For your own practice, you'll learn which exercises target specific areas like the rectus abdominis, obliques, and transversus abdominis. If you teach, you'll gain options for every level, from foundational pelvic tilts to advanced arm balances, all of which build the stability that supports just about every other yoga pose. This is about understanding that core strength is woven throughout practice, not isolated in a few exercises.
Objective
Be prepared to choose and teach many exercises, poses and techniques for cultivating core strength.
Overview
Many yoga poses develop or require core strength. In this digest, we bring together asana variations, exercises and techniques that are particularly core-focused, organized by these categories:
- Pelvic Tilts & Opposite Limb Extension
- Toe Taps, Sit-Ups & Leg Lifts
- Plank & Related Poses
- Navasana & Standing Poses
- Backbends
- More Options (Twists, Arm Balances, Pranayama)
MANY ASANAS REQUIRE & BUILD CORE STABILITY
Just about all yoga asanas, from standing postures to twists to inversions to balancing poses, require and build abdominal strength and stability… For example, lifting and lowering the legs in inverted poses like Headstand, Handstand, and Shoulderstand gives abs a serious workout. In seated twists, the oblique muscles (located along the sides of the abdomen) work as they lift and rotate the torso. Standing postures such as Triangle Pose and Warrior 2 also work the obliques as well as the deepest abdominal muscle, the transversus abdominis, as they help stabilize the torso and spine. Folding postures, in which the thighs and chest are drawn toward each other, including many arm balances and all sorts of sit-up-like movements, target the most visible belly muscle, the rectus abdominis—the featured player in that washboard look you see in fitness magazines. – Alisa Bauman
Naming Issue
Please note the potential confusion related to the spelling of “Cakravakasana“ (Ruddy Goose) and “Chakravakasana“ (Sunbird). These usually refer to two different poses but some sources will mis-spell the name, causing even more confusion.
- Chakravakasana is used by some sources to refer to Opposite Limb Extension, and by some to refer to a flow that begins standing on the knees.
- Cakravakasana (Ruddy Goose flow) is a flow from Table Pose to Extended Child’s Pose.
- Chakravakasana (Sunbird flow) is a flow from knees to Extended Child’s Pose, then to Balancing Table, Extended Child’s and back to knees.
Pelvic Tilts & Opposite Limb Extension
| Pelvic TiltsSupine | “Pelvic tilts are an exercise comprised of very subtle spinal movements that strengthen the support muscles around the low back, particularly the abdominals. They are a good preliminary exercise for those seeking low back pain relief, and they feel great because they give your back a little massage.” – verywell.com Begin in Bridge Set-Up shown here: on back with feet on floor, arms relaxed alongside torso.Feet are parallel, knees pointing straight up.Optional: squeeze block with inner thighs.Start in neutral position. Notice natural curves of spine: where the back touches the floor and where it doesn’t.Exhale, gently tilt the pelvis, feeling the low back gently press into the floor. Tailbone turns up a little.Inhale, rock pelvis toward heels to return to neutral, or to exaggerate the arch.Repeat.Baxter Bell, MD teaches this in a brief video here |
| Pelvic TiltsAt Wall | In the image shown, our model is doing Chair Pose variation. For the Pelvic Tilt described here, keep the arms and hands relaxed and knees only slightly bent.Place back at wall. Bend knees slightly.Notice natural curves of spine: where the back touches the wall and where it doesn’t.Exhale, gently tilt the pelvis, feeling the low back gently press into the wall.Inhale, return to neutral.Repeat. |
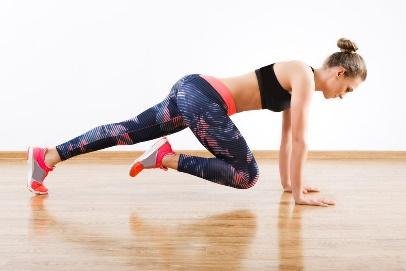
| Tabletop VariationKnees Slightly Back of Hips | Marjaryasana VariationPlacing knees slightly back of hips will make abs need to work harder to stabilize the low back and bear the weight of the pelvis. (source) |
| Balancing TableMarjaryasana Variation | Core Awareness Exercise“[From Table], lift one arm and the opposite leg. Notice the extent to which your core engages. Now lift only your arm. Resist the urge to rotate your pelvis or rib cage. Notice how lifting your arm without lifting the opposite leg makes your abs, especially your upper abs, work harder. Why? No glutes to help! For more intensity, start in Plank Pose and perform the same movements. Both versions use nearly all of your core muscles.” – Mary RichardsSee AlsoMarjaryasana Variations |
| Balancing Table VariationBend Knee of Lifted Leg | Lift knee upward toward ceiling.Optional:Exhale – Contract glutes to pulse leg up a slight amount.Inhale – Slightly release lift.Continue to pulse with the breath.Switch sides. |
| Next StepHold Opposite Foot |
| Balancing Table Core FlowKnee to Nose | Begin in Balancing Table with both hands grounded.Exhale – Round spine, drawing knee and nose toward one another.Inhale – Back to Balancing Table with knee straight or bent. |
| Fire Hydrant LiftsSide Bird Dog Pose | Not shown.With lifted leg straight or bent, take out to the side (like a male dog peeing on a fire hydrant). See picture and instructions here. Option:Begin in Table.Inhale – Lift leg to Balancing Table as shown.Exhale – Take leg out side (perpendicular torso).Inhale – Leg back to Balancing Table.Exhale – Release knee to Table.Switch sides. |
| Balancing Table VariationHold Same Side Foot |
| Opposite Limb ExtensionCore Strengthener | Start in Table.Inhale – reach right arm and left leg.Exhale – Release back to Table.Inhale – reach left arm and right leg.Exhale – Release back to Table.Repeat.VariationBegin in Table.Inhale – to Opposite Limb Extension as shown.Exhale – Take leg and arms out to sides (perpendicular to torso).Inhale – back to Opposite Limb Extension.Exhale – release arm & leg to Table.Switch sides. |
| Opposite Limb Extension Core FlowKnee to Nose | |
| Finding & Engaging the TABasic Education about the Core | A fundamental step can be to assist students who—thinking they are engaging their core—are actually just pulling up their diaphragm and abdominal contents.A common teaching is to lie on the back with feet on the floor. Palpate for the hip points. Then lengthen the spine to draw the hip points toward one another.If the belly poofs out, it may be a sign the student is engaging only the rectus abdominis (the more superficial abdominals).See much more: Anatomy: TA & Engaging Deeper Abs |
| Exercises to Engage Deeper AbsMany Options | Breathing exercises can help students gain awareness of their deeper abdominals. Such practices include focusing on the exhalation and Kapalabhati Pranayama.Another exercise is to sit tall and, on the exhale, hug the waist in from the front, back and sides. Release on the inhale.See much more: Anatomy: TA & Engaging Deeper Abs |
Toe Taps, Sit-Ups & Leg Lifts
| Toe or Heel TapsLifting & Lowering Bent Legs | From Bridge Set-Up shown here, place hands on the belly for to help connect with the muscular actions. "Think about actively compacting the abdomen and front ribs to maintain this starting position in the spine and pelvis throughout." (Tiffany Cruikshank)Bring one leg in toward the chest.Tap one foot to the floor at a time, keeping belly, low back, and pelvis still.Alternate for 30 to 60 seconds.Or:Lift feet so that knees are over hips, shins are parallel to ground.Slowly lower one foot while keeping other knee at 90 degrees.Inhale, tap toe or heel.Exhale, activate low belly and pelvis to lift leg.Alternate for 30 to 60 seconds.Or:Lift and tap both feet at a time.See Also: 1-min video |
| Abdominal / Sacral StrengthenerSit-Up Variation | From Basic Yogic Sit-Up, move feet together.Then move feet as far forward as possible without lifting soles.Exhale, lift.Inhale, lower.Then hold in the upward position for 6 to 8 breaths. (Sarah Powers) |
| Basic Yogic Sit-UpFeet on Floor | On back, feet on floor hip distance apart, knees pointing upBlock or rolled blanket between inner thighsHands in various positions, often clasping behind headAvoid pulling on head or straining neckSoften psoas by imagining thighbones getting very heavy and sinking deep into the hip sockets (Meaghan Rabbitt)“Curl the upper body up but maintain the natural curves of the cervical and lumbar spine. The tailbone will want to curl toward the ceiling, but don’t let it; if it does, you’ll avoid using some your abdominal muscles and your pelvic floor.” (Meaghan Rabbitt) |
| Feet LiftedA Little or A Lot | Lift feet off ground slightly.Or, lift until knees are over hips, shins parallel to the ground. |
| Arm VariationsAnd Leg Variations | Rather than hands behind head, can take arms straight along side body as shown.Another option is to straighten knees as shown here. |
| More Basic Sit-Up VariationsSounding & More Variations | Add “ssss” sound (as in the end of the word, “hiss”) during exhale and lift (Jill Miller).Cross ankles as shown.Or, take legs into Garudasana (Eagle) shape. (May be called Garudasana Crunch or Supta Garudasana Flow.)Arms, too, can be in Garudasana.Option 1Exhale – curl upInhale – lengthen.Option 2Inahle in starting position.Exhale – curl up.Staying lifted, Inhale.Still leited, Exhale – flatten belly while curling more with face moving toward knees.After returning torso to floor, Jill Miller teaches to then reach feet away to stretch legs, inner thighs squeezing. Hold and then unwind legs and release. |
| Twisting VariationElbow to Opposite Knee | From Basic Yogic Sit-Up, bring knees into chest.Straighten left leg.Exhale – draw left elbow toward right knee.Keep both sides of waist long.Inhale – back to center.Switch sides. |
| More Twisting VariationsArm & Leg Variations | Can lift straight leg as shown.Another option is to reach hand to outside of opposite thigh. |
| Core & Hip FlowClam Shell Rollups | See Flow / Mini-Vinyasas for instructions. |
| Lift HipsFeet to Ceiling | From Basic Yogic Sit-Up, with hand behind head, take feet up toward sky.Exhale – lift tail up so feet lift higher toward ceiling.At same time, lift shoulders off ground so as much of spine as possible lifts.Take a few breaths while in lifted position. |
| Urdhva Prasarita PadasanaUpward Extended Feet Pose / Leg Lifts | See Urdhva Prasarita Padasana for instructions on 30-60-90 Lifts. |
| Urdhva Prasarita Padasana VariationSacrum on Block | Not Shown: Sacrum on block, one leg lowered.See article for photo and instructions. |
| Side Lying Leg LiftsMultiple Options | Begin lying on side with legs stacked.For most basic version, see Hip Strengthening Exercises.See 3 min video by Baxter Bell here.When lifting top leg, move slowly and maintain hip engagement as opposed to relying on momentum. Resist gravity on the way down.Arm options include:Bottom arm reaching away as shown in image. Or, bottom arm bent as shown here. Begin with head resting on arm.Rest top arm alongside side body. Or reach it straight out from shoulder as shown here, fingers cupped on floor to aid balance and form.For more challenging variations:Keeping legs together, use obliques to lift legs.Option to also lift head and shoulders, keeping the hand of the stabilizing arm in contact with the floor. If bottom arm is bent, keep head on forearm. If bottom arm is straight, lift head as shown in image.Other variations with band such as shown: |
Continue Reading with Ashtanga Tech
This study guide is available to members. Join to access 800+ in-depth guides on anatomy, philosophy, sequencing, and the science of practice.
Join for $5.50/mo — the cost of a DC coffeeAlready a member? Log in here
Discussion
or explore Asana Theory