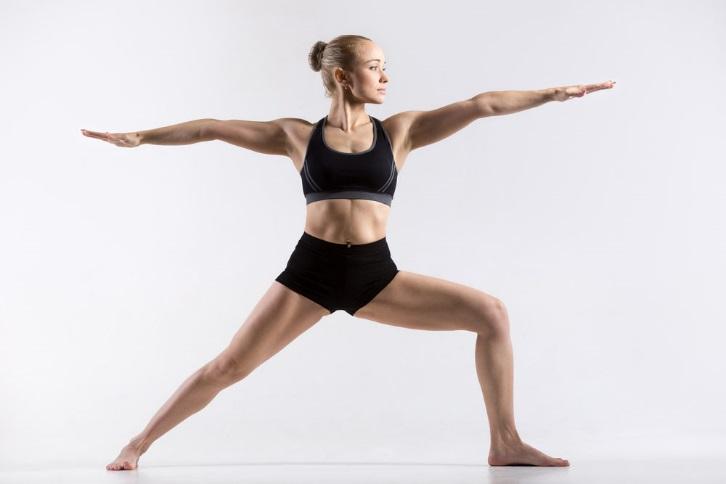
Virabhadrasana II (Warrior 2)
 Yoga Techniques and Fitness
Overview
In this lesson, we present Virabhadrasana II (Warrior 2), an excellent pose for beginners and experienced practitioners that builds strength, opens the body, and develops both physical and emotional stamina.
Objective
Gain understanding of this fundamental standing pose and how it energizes, centers, and grounds while strengthening the legs and opening the hips, chest, and shoulders.
What You'll Get
What You'll Get: You'll discover why Warrior 2 is such a valuable teaching pose—it's accessible yet challenging, building endurance while improving focus and breathing. The lesson breaks down how to protect the knees while strengthening the hips and legs, and how to maintain the open chest and strong arms that make this pose both stable and expansive. You'll learn how it stimulates abdominal organs and activates the first three chakras. For teachers, you'll understand the subtle balance work involved, how to cue the mild twist in the torso, and why this pose is so effective for warming up the hips and developing the stamina needed for more advanced practice.
Virabhadrasana II
Exalted Warrior
Introduction
Virabhadrasana II
veer-ah-bah-DRAHS-anna
Virabhadra = name of a warrior hero
Warrior 2 Pose
Heart of Pose
- Standing Pose
- Strengthening, Opening and Building Stamina
Notes
- Warrior 2 Pose is an excellent pose for beginners (as well as experienced practitioners).
- As a Standing Pose, it has the associated benefits and uses, with particular benefits in warming up hips.
- Do you know how the Warrior poses got their numbers of I, II & III? “They are traditionally known as 1, 2, and 3 not because of sequence, but because there are that many limbs extended. How does the joining or releasing of the hands affect your breathing? Your sense of strength? What thoughts or feelings arise in you as you hold each pose?” – Zo Newell, Downward Dogs & Warriors 2007 p 18
See Also
Effects / Benefits
Energy, Mood, Emotion
Effects to energy, mood or emotion may include the following.
- Energizing.
- Centering.
- Grounding.
- Improves mental focus.
- Challenges both physical and emotional stamina.
- Improves breathing.
- Said to activate first, second and third chakras.
Inner Body
Inner body effects may include the following.
- Said to stimulate abdominal organs.
Musculoskeletal – General
Musculoskeletal effects may include the following.
- Strengthens and stretches legs and ankles.
- Improves muscular endurance and stamina.
- Opens pelvis, stretches groins.
- Expands chest.
- Opens shoulders.
- Baxter Bell notes that the pose is also a mild twist and that because the feet are stepped apart and in different directions, that it’s a beginner “balancing pose.”
Musculoskeletal – Specific
- Tones abductors.
- Strengthens deep hip rotators, glute muscles and knee extenders of back leg.
- Strengthens hip flexors of front leg.
- Strengthens deltoids, upper trapezius, supraspinatus and other muscles that keep arms parallel to the floor.
- Stretches adductors and hamstrings.
- Lengthens psoas and gastroc-soleus of back leg.
- Opens pec major and biceps.
Therapeutic Uses*
- Anxiety (Baxter Bell)
- Backache – opening groin region releases low back compression
- Carpal Tunnel Syndrome
- Depression or Fatigue (Baxter Bell)
- Flat Feet
- Infertility
- Osteoporosis
- Sciatica
* This pose is often associated with positive effects related to the conditions listed. But unless trained in yoga therapy, teachers are usually advised against “prescribing” particular asanas to address specific conditions.
Cautions
When choosing a variation or alternative, consider the following:
- The heart / purpose of the pose.
- The role it is playing in the sequence.
- Why the pose is not accessible or appropriate for this student at this time.
Contraindications
This pose generally not recommended for students with these conditions:
General Cautions
- In the case of uncontrolled blood pressure or a history of heart disease, Baxter Bell recommends holding the pose for no longer than a few breaths as it increases workload on the heart.
- For balance and stability issues, use wall or chair. See Variations.
Cue to Consider Avoiding: “Square Hips”
Very few practitioners are able to keep their hips squared to the long side of the mat and their knee bent at a 90-degree angle without torquing the knee or compressing the lower back. Instead of trying to square the hips fully, [find your ideal hip angle.] – Rachel Scott
- Because most students won’t be able to actually square the hips, perhaps cues such as “open the hips” or others may be useful. Please see Basic Form (or the article link above) for instructions on helping students find their ideal hip angle.
- Add see Verbal Cues for much more on this topic.
Knee Cautions
- Ensure front knee is aligned over ankle. Avoid allowing the knee to fall in or outward. See quote below.
- Lengthen back knee without hyperextending it.
KNEE PAST ANKLE NOT PARTICULARLY INJURIOUS; KNEE FALLING INWARD MORE RISKY
There is nothing inherently wrong with your knee moving past your ankle joint. Really far forward is going to add more stress and strain to the knee joint itself, but it’s not like we’re loading… weight onto our back while doing it, which would of course increase the forces going into the knee. The bigger issue… when we’re doing yoga poses where the knee is moving forward onto the ankle or beyond, is when the knee starts to sneak inward… As it sneaks inwards, then you have forces moving in different directions through the knee joint. That is more likely to increase the possibility of injury. – David Keil
Watch Out For: Front Knee Falling Inward
Teaching Considerations
- Begin again using Basic Form setup so that proper hip angle has been found and front knee is aligned over ankle.
- Press knee toward pinky-toe side of foot.
- Roll inner thigh up and out to draw knee over ankle.
Learning Forward
Watch out for leaning forward, causing rib cage to be out in front of pelvis, as shown here.
Teaching Considerations
- Align rib cage over pelvis.
- Reach strongly back with back arm.
- Keep back wrist over back angle.
- Keep hips level and pelvis neutral. Avoid pelvis tipping forward, causing a backbend.
Front Knee Beyond Toes
Watch out for front knee extending beyond toes as shown here, and/or a stance that is too short.
Teaching Considerations
- Take arms out to sides; position lets so ankles under wrists.
- Extend stride until front knee is over ankle.
More to Watch Out For
- Watch out for back foot not grounding and a lack of engagement in back leg.
- Watch out also, for a gaze down rather than to horizon or front fingertips.
Teaching Considerations
- Press into outer edge of back leg.
- Root pelvis down toward back heel.
- Keep back leg firm.
- Distribute work evenly between both legs.
Adaptations & Alternatives
If conditions related to stamina, size or balance make full pose inappropriate, consider such adaptations as these:
- Take arms to waist
- Place a chair under student
- Press back leg into wall
See also variations.
Vary Arm Position
- Consider options such as arms in Cactus / Goal Post shape, Eagle arms, or hands at waist.
Back Foot at Wall
- While the following photo is a variation of Warrior 1 rather than Warrior 2, it demonstrates supporting back foot at wall.
More Options
The options above retain the leg action of the pose to build grounding, strength and stamina while opening. If those poses don’t work, some of the shape can be accomplished by having student stand on knees on blanket. Take front knee out as in full pose.
Basic Form
Set Up
- Begin in a wide length stance.
- Turn front foot out 90°.
- Turn back foot in 30° to 45°.
Moving into Pose
FIND IDEAL HIP ANGLE
"Very few practitioners are able to keep their hips squared to the long side of the mat and their knee bent at a 90-degree angle without torquing the knee or compressing the lower back. Instead of trying to square the hips fully, [find your ideal hip angle as follows.] – Rachel Scott
- With hands on hips, turn hips toward front knee (as in Warrior 1). Pelvis is neutral and the lumbar curve is natural.
- Keeping knee aligned, slowly turn pelvis toward long side of mat until knee starts to fall inward (which indicates too far).
- Then turn back foot in to match angle of hips.
Inhale
- Lift arms parallel to floor, palms down (or take arms to waist).
- Extend through wrists and fingers.
Exhale
- Bend front knee to form a right angle.
- Draw front sit bone down toward feet.
- Pull low abdominals in.
More
- Inhale, lift chest away from waist.
- Exhale, turn head to gaze over front hand.
Gaze
- Front Fingertips
Hold Time
- 5 to 6 breaths
Coming Out
- Inhale, straighten front knee.
To Emphasize
- Keep front knee aligned over ankle.
- Draw front sit bone under.
- Keep back leg firm, grounding through back foot.
- Keep hips centered and level, pelvis neutral.
- Draw shoulder blades down back.
Verbal Cues
It’s typically advised that teachers provide no more than three instructions per pose so that students have time to work with the teaching. Here you’ll find many options from which to choose. Some cues make the same point in different ways, and occasionally some can be contradictory... so please try them out for yourself. When cues are unusual or uniquely described, we have noted the source.
Consider Avoiding: “Square Hips”
Very few practitioners are able to keep their hips squared to the long side of the mat and their knee bent at a 90-degree angle without torquing the knee or compressing the lower back. Instead of trying to square the hips fully, [find your ideal hip angle.] – Rachel Scott
- Because most students won’t be able to actually square the hips, perhaps cues such as “open the hips” or others may be useful.
- Please see Basic Form (or the article link above) for instructions on helping students find their ideal hip angle.
CONSIDER AVOIDING THE CUE, “ALIGN” OR “SQUARE” HIPS WITH LONG EDGE OF MAT
This well-intended cue fails to account for the fact that most of us don’t have the skeletal structure to externally rotate the thigh a full ninety degrees at the hip. When we try to square our hips to the side of the mat, we either dump the front of our pelvis forward (creating lower back compression) or collapse our front knee inward. Focus instead on maximizing the range of motion possible for your hips. Once you have bent your front knee to 90 degrees, keep your front knee over your front ankle as you turn your pelvis toward the long side of your mat only to the extent that is possible for your body without the front knee rolling in. – Rachel Scott
Pelvis & Legs
It’s usually advised to teach standing poses “from the ground up.” Avoid focusing on upper body alignment, pose refinements or deepening the expression of the pose until the foundation is properly aligned and steady.
Pelvis
- Avoid tilting front of pelvis forward.
- See Basic Form for safe way to set up.
Back Leg
- Ground down into outer edge of back foot.
- Lift inner thigh of back leg.
- Extend and lengthen back knee.
- Keep back leg firm.
- Lift back ankle and maintain natural arch.
Front Leg
- Align knee over ankle.*
- Turn knee toward pinky toe as much as you can while staying rooted through base of big toe & hugging inner ankles in.
- Press into inner heel of front foot.
- Let front hip drop (keeping back leg firm).
- If front leg fatigues, partially straighten front knee for a breath or two and then return to fuller expression.
*Please see: Common Problems in Alignment Cueing for Standing Poses
Both Legs
- Rotate inner thighs out and away from each other.
- Stretch mat apart with your feet.
- Vary feet distance as needed. (See Variations.) As the inner legs warm up, lengthen stride as appropriate.
CORRECT MISALIGNMENT BY FOCUSING ON TWO ACTIONS
[The cue] “As you bend your knee, point your kneecap directly toward your middle toe,” [is designed] to stabilize your thighbone and knee in healthy alignment. But that’s often easier said than done… you may collapse your front knee inward when you come into Warrior II. To correct this misalignment, you need to focus on two actions… The first is stretching your hip adductors… The other secret to proper alignment of the bent leg… is engaging and strengthening the muscles that externally rotate your thigh. The main external rotators are the gluteus maximus and the six deep rotators that lie underneath it. – Julie Gudmestad
Upper Body
Torso
- Stack shoulders over hips.
- Balance rib cage over pelvis.
- Press shoulder blades into back.
- Release shoulders down.
- Expand the chest.
- Lift sternum and back ribs.
- Keep lifting up the side waist, lengthening the torso.
- Lift low belly toward spine.
- Draw tailbone and low back in.
- Press tailbone toward front knee.
- Adjust pelvis so waistline stays parallel to floor.
Arms
- Extend back arm away from your body.
- Keep arms parallel to floor.
- Align front arm directly above front thigh and back arm over back leg.
- Imagine someone pulling your arms away from each other.
Shoulders
EXPERIENCE “THE SHRUG”
Make sure your arms are in the same plane as your shoulders or slightly forward of the shoulders. To experience “the shrug,” rotate your hands and arms so your thumbs face downward: feel how the muscles on either side of your neck hunch upward, the deltoids tense, and the shoulders feel blocked. Now rotate your hands and arms so the palms face up, even reaching your little fingers upward. The hunching dissipates: the upper inner corners of your shoulder blades release down your back, softening the sides of your neck. Feel how the weight of your arms is supported more by your shoulder blades, which are planted firmly on your back, and less by your neck: you’ll especially feel a firming of the muscles at the outer edges of your shoulder blades, as the deltoids soften and the shoulder joints begin to feel more open and free. Do a few small arm circles to feel the support offered by the shoulder blades. – Doug Keller
More
- Gaze over middle finger of front hand.
- Soften eyes.
- Breathe deep and free.
- Become inwardly detached.
CONCENTRATE & YOU WILL RADIATE!
Drop your brain. Drop your shoulders. Lift & open your heart center. Concentrate & you will radiate! –Baron Baptiste
Workshop with Roger Cole
See Yoga International’s article Foundation of a Warrior by Roger Cole for in-depth alignment work. Here are primary teachings from the dense article:
Both Virabhadrasana I & II
Back Foot
- In Warrior I turn back foot in 60 degrees.
- In Warrior II, turn back foot in about 10 to 15 degrees.
Back Leg
- In both poses, create Tadasana actions in the back leg.
- Straighten knee strongly.
- Press outer side of foot down.
- Move upper-inner thigh backward.
Front Knee & Hip
- In both poses, bend front knee toward 90-degree angle without taking it beyond ankle.
Pelvis
- In both poses, hold front knee and hip stable and use front hip joint as pivot point for pelvis.
- In Warrior I, pelvis swings toward bent knee.
- In Warrior II, pelvis swings away from bent knee.
- In Warrior I, make an additional effort to press sitting bone of back leg as far forward as possible to tilt the pelvis more upright.
Continue Reading with Ashtanga Tech
This study guide is available to members. Join to access 800+ in-depth guides on anatomy, philosophy, sequencing, and the science of practice.
Join for $5.50/mo — the cost of a DC coffeeAlready a member? Log in here
Discussion
or explore Asana Theory